
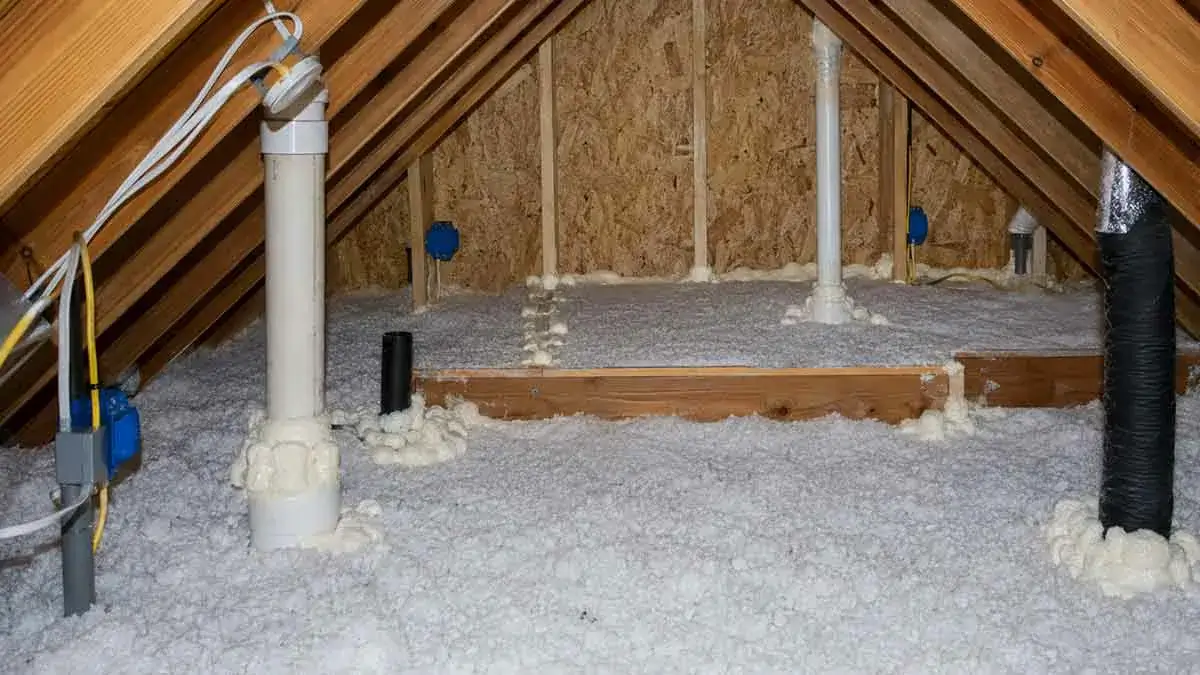
Attic air sealing is an important part of improving a home’s energy efficiency, comfort, and building-envelope performance. Even an attic with sufficient insulation can lose energy if gaps and openings allow uncontrolled air movement between the living space and the attic.
During winter, warm indoor air can escape through ceiling penetrations and enter the attic. During summer, hot attic air can move toward the living space. These leaks can contribute to drafts, uneven temperatures, increased heating and cooling demand, and moisture movement into the attic.
Air sealing addresses these unwanted pathways by closing gaps, cracks, penetrations, and openings in the boundary between conditioned living areas and the attic.
This guide explains what attic air sealing is, why it matters, where common air leaks occur, how to find them, which materials may be appropriate, and when professional help is necessary.
Table of Contents
What Is Attic Air Sealing?
Attic air sealing is the process of closing unintended gaps and openings that allow air to move between the conditioned part of the home and the attic.
These openings can occur around:
- Electrical wiring
- Plumbing pipes
- Ceiling fixtures
- Recessed lights
- HVAC penetrations
- Ductwork
- Attic hatches
- Wall top plates
- Chimneys
- Flues
- Mechanical equipment
The objective is not to eliminate all airflow from the attic.
Attics may require intentional ventilation through components such as soffit, ridge, gable, or roof vents. Air sealing instead focuses on the air barrier between the conditioned living space and the attic.
This distinction is essential because blocking intentional attic ventilation can create problems rather than solve them.
Why Attic Air Sealing Matters
Uncontrolled air leakage can reduce the effectiveness of a home’s insulation and increase the amount of energy required to maintain comfortable indoor temperatures.
Proper air sealing can help:
- Reduce unwanted air leakage
- Improve indoor comfort
- Reduce drafts
- Improve temperature consistency
- Reduce heating and cooling demand
- Improve the performance of attic insulation
- Limit moisture-laden indoor air entering the attic
- Improve overall building-envelope performance
The actual benefit depends on how leaky the home is before the work is completed.
A home with numerous large air leaks may have substantially more potential for improvement than a home that is already relatively airtight.
Air Sealing vs Attic Insulation
Air sealing and insulation perform different functions.
Air sealing limits uncontrolled air movement through gaps and openings.
Insulation slows heat transfer through building materials.
For example, a ceiling can have a thick layer of insulation while still allowing air to pass through holes around wiring, plumbing, or light fixtures.
That means adding more insulation does not necessarily solve an air-leakage problem.
A common approach is to:
- Identify air leaks.
- Seal appropriate openings.
- Address moisture or safety problems.
- Install or improve insulation.
Combining an effective air barrier with sufficient insulation generally provides better building-envelope performance than relying on insulation alone.
How Air Moves Through an Attic
Air movement is driven by differences in pressure and temperature.
During cold weather, warm indoor air can move upward through gaps in the ceiling. This movement can carry moisture into the attic.
During hot weather, the attic can become much warmer than the living space, increasing the potential for heat transfer and air movement through openings.
Air can travel through surprisingly small openings around:
- Pipes
- Wires
- Framing
- Fixtures
- Access panels
- Mechanical penetrations
Sealing these pathways helps create a more continuous boundary between the conditioned and unconditioned portions of the home.
Common Attic Air Leakage Areas
Certain parts of an attic deserve particular attention during an air-sealing inspection.
Electrical Penetrations
Electrical wiring often passes through holes in ceiling framing.
Small gaps around wires can allow air to move into the attic.
These openings may be sealed using an appropriate material, but care is necessary around electrical components.
Do not damage wiring or cover electrical equipment in a way that violates its installation requirements.
If you discover damaged insulation around wiring, exposed conductors, or questionable electrical work, stop and have the condition evaluated by a qualified electrician.
Plumbing Penetrations
Plumbing pipes frequently pass through the ceiling and attic floor.
Gaps around pipes can create direct pathways for air movement.
Appropriate sealing can reduce leakage around these penetrations, but the material must be compatible with the pipe and surrounding conditions.
Do not interfere with required movement, expansion, access, or other plumbing requirements.
Ceiling Fixtures
Ceiling-mounted fixtures can create openings through the ceiling plane.
Examples include:
- Light fixtures
- Electrical boxes
- Fans
- Speakers
- Other ceiling-mounted equipment
Inspect the area around each fixture and determine whether the opening represents an unintended air leak.
The correct sealing method depends on the fixture and its installation requirements.
Attic Hatch
The attic access hatch is often an overlooked source of air leakage.
A poorly fitted hatch can allow conditioned air to escape into the attic.
Inspect the hatch for:
- Visible gaps
- Poor fit
- Missing weatherstripping
- Warping
- Missing insulation
- Damaged edges
Because the hatch provides direct access through the ceiling, improving its air seal can be a relatively simple way to improve the building envelope.
Wall Top Plates
The top plates of walls can contain gaps where framing components meet.
These gaps can connect wall cavities to the attic.
Sealing accessible openings around top plates can help create a more continuous air barrier between the living space and attic.
The exact approach depends on the construction of the home and the materials surrounding the opening.
HVAC Duct and Equipment Penetrations
HVAC systems may pass through the attic floor or ceiling boundary.
Gaps around ducts, pipes, equipment, and other mechanical penetrations can permit air movement.
Inspect these areas carefully and seal appropriate gaps without interfering with equipment operation, access, insulation requirements, or ventilation.
Duct leakage itself is a separate issue from air leakage through the ceiling plane, so both should be evaluated when necessary.
Chimneys and Flues
Chimneys and combustion flues require special attention.
These components can become very hot and may require specific clearances from combustible materials.
Ordinary spray foam or caulk should not be used where it is incompatible with the temperature or fire-safety requirements.
Use only materials and installation methods specifically appropriate for the application.
If the attic contains a gas appliance, furnace, fireplace, chimney, or combustion vent, professional evaluation may be the safest approach.
Recessed Lights
Recessed lights can be difficult to air seal because their requirements vary by fixture design.
Some fixtures are designed for contact with insulation, while others require specific clearances.
Before sealing around a recessed light:
- Identify the fixture type.
- Check manufacturer requirements.
- Maintain required clearances.
- Use only compatible sealing methods.
Never cover a heat-producing fixture with insulation or sealant unless the installation requirements specifically allow it.
How to Find Attic Air Leaks
Finding the leaks is often more important than choosing the sealing material.
Start with a visual inspection and focus on the boundary between the living space and attic.
Look for:
- Visible gaps
- Cracks around penetrations
- Disturbed insulation
- Dark dust patterns
- Missing insulation around openings
- Light visible through gaps
- Drafts
- Areas where insulation appears compressed or displaced
Dust accumulation can sometimes reveal air movement because moving air can carry particles through gaps.
However, visual inspection does not always identify every leakage point.
Visual Inspection
A flashlight can make small openings easier to identify.
Inspect areas around:
- Electrical wiring
- Plumbing
- Ceiling fixtures
- Attic hatches
- Wall top plates
- Duct penetrations
- Recessed lights
- Chimneys and flues
Do not move insulation unnecessarily if doing so could expose electrical components, unstable surfaces, or other hazards.
Blower Door Testing
A blower door test provides a more systematic way to evaluate air leakage.
A temporary fan is installed in an exterior doorway and creates a controlled pressure difference between the inside and outside of the home.
The test can help determine:
- How leaky the building is
- Whether air sealing may provide significant benefits
- Where major leakage pathways may exist
Professionals may combine blower door testing with visual inspection, smoke testing, infrared imaging, or other diagnostic techniques.
This can be particularly useful when leaks are difficult to locate.
Prepare Before Air Sealing
Before sealing attic air leaks, inspect the attic for conditions that need to be addressed first.
Look for:
- Roof leaks
- Wet insulation
- Mold
- Condensation
- Damaged wiring
- Pest activity
- Structural problems
- Combustion equipment
- Poorly installed ventilation
- Damaged ductwork
Do not use air-sealing materials to hide or cover an underlying problem.
For example, a roof leak should be repaired at the source before insulation or air-sealing work is completed.
Likewise, damaged electrical wiring should be evaluated before surrounding openings are sealed.
Common Attic Air Sealing Materials
The appropriate material depends on the size and location of the opening.
Common materials include:
- Caulk
- Spray foam
- Fire-rated sealant
- Foam backer materials
- Sheet materials
- Rigid insulation
- Weatherstripping
Material selection should consider:
- Gap size
- Surrounding materials
- Temperature
- Fire requirements
- Movement
- Moisture conditions
- Manufacturer instructions
There is no single sealing product that is appropriate for every attic penetration.
Using Caulk for Small Gaps
Caulk can work well for relatively small and narrow gaps.
It may be appropriate around:
- Framing joints
- Small cracks
- Stationary surfaces
- Minor penetrations
Select a product designed for the specific surface and conditions.
Caulk is generally less suitable for large openings where substantial amounts of material would be required.
Using Spray Foam for Larger Gaps
Expanding spray foam can be useful for certain larger openings.
However, it expands after application and must be used carefully.
Too much foam can:
- Expand into unwanted areas
- Interfere with components
- Cover equipment
- Create installation problems
Spray foam should not be used indiscriminately around electrical components, combustion equipment, chimneys, flues, recessed lights, or other areas with specific clearance requirements.
Always follow the product’s installation instructions.
Fire-Rated Air Sealing
Some openings require fire-resistant sealing rather than ordinary caulk or foam.
This can apply to certain:
- Rated assemblies
- Mechanical penetrations
- Electrical penetrations
- Chimneys
- Flues
- Fire separations
The appropriate product must be compatible with the specific assembly and application.
Do not assume that a product labeled “fire resistant” is automatically suitable for every location. Installation must follow the product listing and applicable building requirements.
How to Air Seal an Attic Hatch
The attic hatch should form a reasonably tight connection with the ceiling plane.
Common improvements include:
- Inspect the hatch and surrounding frame.
- Remove or repair damaged weatherstripping.
- Install appropriate weatherstripping around the perimeter.
- Seal fixed gaps around the frame where appropriate.
- Add suitable insulation to the hatch.
- Make sure the hatch remains easy and safe to operate.
The insulation on the hatch should not interfere with access or create a hazard.
A hatch that is insulated but not properly sealed can still allow air leakage.
How to Seal Plumbing and Electrical Penetrations
Penetrations should be evaluated individually.
For appropriate openings:
- Identify the penetration.
- Determine whether the opening is intentional.
- Check for electrical, plumbing, or mechanical safety requirements.
- Select a compatible sealing material.
- Seal the gap without damaging the component.
- Confirm that required clearances remain intact.
Do not seal an opening simply because it appears to be a hole.
Some openings may serve an intentional function or require access for maintenance.
Air Sealing Around HVAC Penetrations
HVAC equipment and ductwork require careful attention.
Seal appropriate gaps around the building-envelope penetration, but do not:
- Restrict airflow
- Block equipment access
- Cover controls
- Interfere with required clearances
- Seal components that require ventilation
If ducts are leaking at their joints, that is a separate duct-sealing issue and may require appropriate duct sealant or professional HVAC service.
Do Not Seal Attic Ventilation
One of the most important rules of attic air sealing is to avoid confusing air leakage with intentional attic ventilation.
Typical attic ventilation components include:
- Soffit vents
- Ridge vents
- Gable vents
- Roof vents
These openings are designed to move air through the attic.
They should not be sealed simply because they allow airflow.
The objective of air sealing is to close unwanted openings between the conditioned home and attic while preserving the attic’s intended ventilation strategy.
Air Seal Before Adding Insulation
If additional attic insulation is planned, major air sealing is generally easier to perform first.
A practical sequence is:
- Inspect the attic.
- Identify safety and moisture problems.
- Locate major air leaks.
- Seal appropriate penetrations.
- Confirm ventilation pathways remain open.
- Install or improve insulation.
- Inspect the completed work.
Insulation can cover penetrations and make future air-sealing work more difficult.
For this reason, completing major air sealing before adding insulation is often more efficient.
Attic Air Sealing and Moisture Control
Air sealing can play a role in moisture management because warm indoor air can carry water vapor into a colder attic.
When moisture-laden air reaches cold surfaces, condensation can occur under the right conditions.
Potential signs of attic moisture problems include:
- Damp insulation
- Water stains
- Mold
- Condensation
- Wet roof framing
- Musty odors
- Frost accumulation in cold climates
Air sealing can reduce unwanted air transport, but it is not a substitute for fixing roof leaks, plumbing leaks, or inadequate moisture control.
The attic should be evaluated as a complete system involving:
- Air control
- Moisture control
- Insulation
- Ventilation
- Roofing
- Indoor humidity
Can You Air Seal an Attic Yourself?
Some simple air-sealing tasks can be appropriate for experienced homeowners.
Examples may include:
- Weatherstripping an attic hatch
- Sealing small accessible gaps
- Improving the seal around an appropriate access panel
However, attic work can involve significant hazards.
Professional assistance is more appropriate when the project involves:
- Damaged electrical wiring
- Combustion equipment
- Chimneys
- Flues
- Extensive spray foam
- Difficult-to-access areas
- Fire-rated assemblies
- Significant moisture problems
- Complex HVAC equipment
If you cannot confidently identify the purpose of an opening or the correct sealing material, do not seal it until it has been evaluated.
Common Attic Air Sealing Mistakes
Sealing Everything
Not every opening is an air leak.
Intentional ventilation openings should remain functional.
Using the Wrong Material
A material suitable for a small interior crack may not be appropriate around high-temperature or fire-rated components.
Ignoring Moisture Problems
Air sealing should not be used to cover roof leaks, condensation, or wet insulation.
Address the source of moisture first.
Covering Electrical Equipment
Improper sealing around electrical components can create safety problems.
Follow applicable installation requirements and maintain required clearances.
Using Too Much Spray Foam
Expanding foam can grow considerably after application.
Applying too much can interfere with equipment or create unnecessary cleanup.
Blocking Attic Ventilation
Soffit, ridge, gable, and other designed ventilation openings should not be blocked by air-sealing work or insulation.
Skipping the Attic Hatch
A large amount of careful air sealing elsewhere can be undermined by an attic hatch that remains poorly sealed.
Adding Insulation Before Air Sealing
New insulation can make important ceiling penetrations harder to access.
Complete major air sealing first when practical.
How Much Does Attic Air Sealing Help?
The impact varies from one home to another.
Potential benefits depend on:
- Existing air leakage
- Home size
- Climate
- Attic configuration
- Insulation levels
- HVAC efficiency
- Indoor humidity
- Building construction
- Heating and cooling habits
A home with substantial leakage around ceiling penetrations may see more noticeable comfort improvements than a home that already has a well-sealed building envelope.
Air sealing should therefore be viewed as a building-envelope improvement rather than a guaranteed percentage reduction in energy bills.
When to Hire a Professional
Professional help is recommended when:
- Major air leaks are difficult to locate.
- A blower door test is needed.
- The attic contains combustion equipment.
- Chimneys or flues are present.
- Electrical wiring appears damaged.
- Fire-rated assemblies are involved.
- Significant moisture problems exist.
- Extensive spray foam is required.
- The attic is difficult or unsafe to access.
- You are unsure which openings should be sealed.
Depending on the problem, the appropriate professional may be an energy auditor, insulation contractor, electrician, HVAC technician, or qualified building professional.
Attic Air Sealing Checklist
Use this checklist when evaluating an attic air-sealing project:
- Inspect the attic safely.
- Check for roof and plumbing leaks.
- Look for moisture or mold.
- Inspect the attic hatch.
- Check electrical penetrations.
- Check plumbing penetrations.
- Inspect ceiling fixtures.
- Check wall top plates.
- Inspect HVAC and mechanical penetrations.
- Check recessed lights.
- Identify chimneys and flues.
- Distinguish air leaks from ventilation openings.
- Choose sealing materials appropriate for each opening.
- Maintain required clearances.
- Avoid blocking attic ventilation.
- Complete major air sealing before adding insulation when practical.
- Inspect the finished work.
- Consider professional testing if significant leakage remains.
Final Thoughts
Attic air sealing is an important part of creating a more efficient and comfortable home. Unlike insulation, which primarily slows heat transfer, air sealing focuses on stopping uncontrolled air movement through gaps and penetrations in the building envelope.
The most important areas to inspect include attic hatches, plumbing and electrical penetrations, ceiling fixtures, wall top plates, HVAC penetrations, recessed lights, and other openings between the living space and attic.
Air sealing should be performed carefully. Intentional attic ventilation must remain open, moisture problems should be corrected first, and special precautions are necessary around electrical equipment, chimneys, flues, and combustion appliances.
For simple openings, experienced homeowners may be able to complete limited air-sealing work. More complex situations are best handled by qualified professionals.
When properly planned and combined with adequate insulation, attic air sealing can help reduce drafts, improve indoor temperature consistency, support moisture control, and reduce unnecessary heating and cooling demand.