
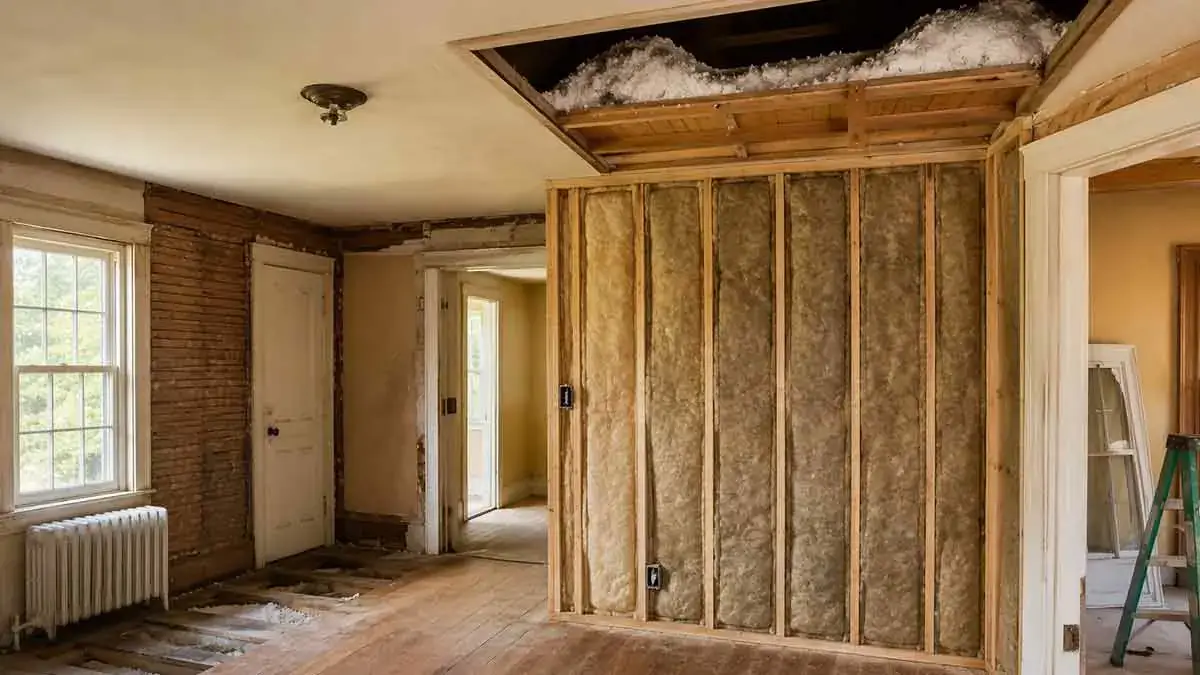
Insulating an older home can improve comfort, reduce unwanted heat transfer, and help lower heating and cooling demand. Many older houses were built before modern insulation and air-sealing practices became common, so they may have missing insulation, settled materials, unsealed openings, inefficient windows, or poorly insulated additions.
However, insulating an older home requires more planning than insulating a new house. Older buildings can contain historic materials, unusual wall assemblies, moisture problems, aging foundations, and construction details that were designed to dry differently from modern assemblies.
Adding insulation without understanding the existing structure can sometimes trap moisture, block ventilation, or hide problems that should be repaired first.
The best approach is to evaluate the home’s condition, identify the largest sources of heat loss and air leakage, correct moisture problems, and then improve insulation in a logical order.
This guide explains how to insulate an older home, which areas to prioritize, how to choose insulation, and what problems to check before starting the project.
Table of Contents
Why Older Homes Often Need Better Insulation
Older homes were often built before current energy-efficiency practices became standard.
Depending on the age and construction of the house, you may find:
- Little or no insulation in some areas
- Thin or settled attic insulation
- Uninsulated exterior walls
- Cold floors over crawl spaces or garages
- Air leaks around windows and doors
- Unsealed plumbing and electrical penetrations
- Uninsulated rim joists
- Inefficient additions
- Damaged or displaced insulation
Even homes that were insulated when originally built may develop performance problems over time.
Insulation can also be disturbed during remodeling, electrical work, plumbing repairs, roofing projects, or window replacement.
Improving insulation can help reduce heat transfer and create more consistent indoor temperatures. However, insulation should be considered as one part of the home’s overall building envelope.
Start With a Home Energy Assessment
Before adding insulation, identify where the home’s largest energy losses are occurring.
A professional home energy assessment may help identify:
- Air leakage
- Poorly insulated areas
- Attic heat loss
- Wall insulation deficiencies
- Duct losses
- Window and door problems
- Moisture issues
- Areas with significant temperature differences
Some energy professionals use tools such as blower-door testing and infrared imaging to identify air leakage and temperature patterns.
You do not necessarily need to insulate the entire house at once.
Prioritizing the areas with the greatest problems can provide better results for a limited budget.
For example, improving attic insulation and air sealing may be more practical initially than opening every exterior wall.
Fix Moisture Problems First
Moisture problems should be addressed before adding insulation.
Inspect the home for:
- Roof leaks
- Foundation leaks
- Plumbing leaks
- Damp walls
- Condensation
- Mold
- Rot
- Water stains
- Poor drainage
- Leaking gutters or downspouts
Do not use insulation to cover up an active water problem.
Water entering through the roof, foundation, windows, or exterior walls can damage insulation and surrounding building materials.
Correcting the source of moisture first makes the insulation project safer and more effective.
Inspect the Attic
The attic is often one of the highest-priority areas in an older home.
A poorly insulated attic can allow substantial heat transfer between the living space and outdoors.
Inspect the attic for:
- Missing insulation
- Thin insulation
- Compressed insulation
- Settled insulation
- Moisture
- Mold
- Roof leaks
- Air leakage
- Damaged framing
- Poorly managed ventilation
Look for areas where insulation is missing around penetrations, attic hatches, or other openings.
If the attic insulation is old but still dry and in good condition, adding compatible insulation may sometimes be possible rather than removing everything.
However, damaged, contaminated, or wet insulation should be evaluated before being covered.
Air Seal Before Adding Attic Insulation
Adding insulation over significant air leaks can limit the effectiveness of the upgrade.
Common attic air leakage locations include:
- Plumbing penetrations
- Electrical wiring
- Attic hatches
- Duct penetrations
- Ceiling openings
- Top plates
- Open framing cavities
- Recessed lighting openings where applicable
Air sealing these areas before adding insulation can improve the performance of the attic assembly.
Use materials appropriate for the application.
Special care is required around chimneys, flues, and other heat-producing components because ordinary sealants and insulation may not be suitable in those locations.
Check Attic Ventilation
Older homes can have ventilation systems that differ from modern construction.
Before adding insulation, determine how the attic is intended to ventilate.
Do not block intentional ventilation pathways at:
- Eaves
- Soffits
- Ridge vents
- Gable vents
- Other designed openings
Insulation should remain in the intended thermal boundary while required ventilation pathways remain unobstructed.
If the attic has moisture problems or unusual ventilation conditions, evaluate the system before making major changes.
Inspect Existing Wall Insulation
Exterior wall insulation is difficult to inspect because it is usually hidden behind plaster, drywall, siding, or other finishes.
Possible signs of inadequate wall insulation include:
- Cold exterior walls
- Cold spots
- Uneven room temperatures
- Drafts around outlets
- High heating or cooling demand
- Areas exposed during previous remodeling
- Missing insulation discovered around repairs
Possible inspection methods include:
- Reviewing construction records
- Inspecting accessible cavities
- Removing a small section of finish
- Using specialized inspection equipment
- Hiring an energy professional
Do not assume that an older wall contains no insulation.
It may contain fiberglass, cellulose, mineral-based materials, or other insulation that has settled, deteriorated, or been installed incompletely.
How to Add Insulation to Existing Walls
Retrofitting insulation into finished walls can be more complicated than insulating an open wall during construction.
Possible approaches include:
- Blown-in insulation
- Dense-pack insulation
- Removing interior finishes
- Removing exterior siding
- Installing exterior insulation during a siding project
- Installing interior insulation during remodeling
Blown-in or dense-pack methods may allow insulation to be added through relatively small access openings.
However, wall cavities must be inspected for wiring, plumbing, fire blocking, and other obstructions.
The installer must also ensure that the selected insulation is appropriate for the existing wall assembly.
Be Careful With Historic Walls
Historic homes may contain construction methods and materials that differ significantly from modern buildings.
Examples include:
- Solid masonry walls
- Plaster and lath
- Historic wood siding
- Older vapor-control materials
- Unusual framing
- Lime-based masonry
- Historic windows
These walls may have been designed to manage moisture and drying differently from modern assemblies.
Adding highly moisture-resistant or impermeable materials without understanding the wall can interfere with drying and potentially contribute to deterioration.
If the home has historic significance or unusual construction, consult a professional experienced with older buildings before making major changes.
Insulate the Basement
Basements can contribute to heat loss and cold floors above them.
Before insulating, inspect the basement for:
- Water intrusion
- Damp foundation walls
- Condensation
- Mold
- Foundation cracks
- Plumbing leaks
- Poor drainage
Moisture problems should be corrected first.
Depending on the home’s design, insulation may be installed on foundation walls, the basement ceiling, or other parts of the thermal boundary.
The correct approach depends on whether the basement is conditioned, unconditioned, finished, or intended to become living space.
Insulate Crawl Spaces
If the older home has a crawl space, inspect its condition before choosing an insulation strategy.
Look for:
- Standing water
- Damp soil
- Mold
- Damaged insulation
- Pest activity
- Foundation leaks
- Poor drainage
- Condensation
In a traditional vented crawl space, insulation may commonly be installed between floor joists.
In an appropriately designed unvented or encapsulated crawl space, insulation may instead be installed along foundation walls as part of a larger moisture and air-control strategy.
Do not simply close crawl space vents without addressing the rest of the system.
Insulate Floors Over Unconditioned Areas
Floors above garages, crawl spaces, porches, or other unconditioned areas can become uncomfortable during cold weather.
Signs that floor insulation may need improvement include:
- Cold floors
- Drafts
- Uneven room temperatures
- High heating demand
Where accessible, inspect the underside of the floor system.
Insulation should be properly supported and installed without creating moisture problems or blocking required ventilation.
Floors above garages may also require careful air sealing because garages are outside the home’s conditioned living space and can contain pollutants that should not enter the house.
Seal and Insulate Rim Joists
Rim joists are common sources of air leakage in older homes.
They are located around the perimeter of the floor system where the floor framing meets the exterior wall.
Potential improvements include:
- Air sealing
- Rigid foam insulation
- Spray foam
- Compatible sealants
- Other approved insulation systems
Because the rim joist forms part of the building envelope, improving this area can contribute to better air tightness and thermal performance.
Check Exterior Doors
Major air leaks around exterior doors can reduce the benefits of insulation improvements.
Inspect:
- Door weatherstripping
- Door sweeps
- Thresholds
- Door frames
- Caulking
- Gaps around trim
Worn weatherstripping and door sweeps are often relatively simple components to replace.
Make sure the door continues to operate correctly after new seals are installed.
Improve Older Windows
Older windows can contribute to heat transfer and air leakage, but replacement is not always necessary.
First determine whether the main problem is:
- Air leakage
- Damaged weatherstripping
- Failed caulking
- Poor glass performance
- Damaged frames
- Failed insulated glass seals
- Poor installation
Possible improvements include:
- Replacing weatherstripping
- Repairing damaged components
- Recaulking appropriate joints
- Installing storm windows
- Using temporary interior insulation measures
- Replacing severely damaged windows
A window that is structurally sound may benefit significantly from targeted repairs.
Seal Electrical and Plumbing Penetrations
Older homes often contain numerous openings around utilities.
Potential air leakage locations include:
- Electrical outlets
- Switch boxes
- Plumbing pipes
- Electrical wiring
- HVAC penetrations
- Exterior hose connections
- Utility lines
Appropriate air-sealing methods can reduce uncontrolled airflow through these openings.
Electrical components should not be modified in a way that creates a safety hazard. When electrical conditions are uncertain, use a qualified professional.
Check HVAC Ductwork
If an older home uses forced-air heating or cooling, inspect ductwork located in unconditioned spaces.
Look for:
- Missing insulation
- Damaged insulation
- Loose connections
- Air leaks
- Poorly sealed joints
Sealing duct connections and restoring appropriate insulation can reduce energy losses.
Ductwork should be evaluated as part of the overall HVAC system rather than treated only as an insulation problem.
Consider Exterior Wall Insulation
Replacing exterior siding can create an opportunity to improve wall insulation.
Depending on the wall design, exterior insulation may be installed beneath new siding as part of a larger building-envelope upgrade.
Potential benefits include:
- More continuous insulation
- Reduced thermal bridging
- Improved wall performance
- Opportunity to repair damaged sheathing
- Improved air and moisture management when properly detailed
However, exterior insulation can affect:
- Window and door detailing
- Flashing
- Trim
- Siding installation
- Wall thickness
- Exterior drainage
The complete wall assembly should be planned before work begins.
Consider Interior Wall Insulation
Major interior renovations can provide access to existing wall cavities.
If walls are already being opened, improving insulation and air sealing at the same time can be more practical than attempting a retrofit later.
Before closing the walls:
- Inspect the framing.
- Check for moisture.
- Repair damaged materials.
- Inspect existing insulation.
- Install appropriate insulation.
- Seal relevant penetrations.
- Complete the wall assembly correctly.
Interior insulation may slightly reduce usable floor area depending on the thickness of the new assembly.
Choose the Right Insulation Material
Different areas of an older home may require different insulation materials.
Common options include:
- Fiberglass
- Mineral wool
- Cellulose
- Rigid foam
- Spray foam
- Blown-in insulation
Consider the following when selecting a material:
- Location
- Existing wall or roof assembly
- Moisture exposure
- Available cavity depth
- Air-sealing requirements
- Installation method
- Cost
- Fire-safety requirements
- Compatibility with existing materials
There is no single insulation material that is ideal for every older home.
The correct choice depends on the complete assembly and the conditions of the building.
Understand R-Value
R-value measures resistance to heat flow under specified test conditions.
A higher R-value generally indicates greater resistance to heat transfer.
However, the rated R-value of insulation does not represent the performance of the entire wall, roof, or floor assembly.
Actual performance can also be affected by:
- Air leakage
- Thermal bridging
- Framing
- Installation quality
- Moisture
- Windows
- Doors
- Other building-envelope components
The appropriate insulation level depends on climate, construction, and applicable energy requirements.
Air Sealing vs Insulation
Air sealing and insulation perform different functions.
Insulation slows heat transfer.
Air sealing limits uncontrolled movement of air.
Older homes often benefit from both.
Common air leakage areas include:
- Attic penetrations
- Rim joists
- Window frames
- Door frames
- Plumbing penetrations
- Electrical penetrations
- Floor openings
- Gaps between building materials
A wall or ceiling can contain substantial insulation and still perform poorly if significant air leakage remains.
Moisture and Vapor Control
Moisture control is especially important when upgrading an older home.
Water can enter through:
- Roof leaks
- Foundation leaks
- Plumbing
- Windows
- Exterior walls
- Condensation
- Poor drainage
- High indoor humidity
Do not cover an unresolved moisture problem with insulation.
Vapor control is also different from air sealing. A vapor-control layer manages water vapor movement through an assembly, while an air barrier controls air movement.
The appropriate vapor-control strategy depends on the climate and the wall or roof assembly.
Avoid automatically adding highly vapor-impermeable materials to older walls without understanding how the existing assembly manages moisture.
Avoid Trapping Moisture in Older Walls
Older walls may rely on drying paths that differ from those used in modern construction.
Adding materials that significantly restrict drying can sometimes create moisture problems.
This is particularly important for:
- Solid masonry walls
- Historic buildings
- Older wood-frame walls
- Moisture-prone exterior walls
- Walls with existing water damage
Before adding insulation, understand where water and vapor can move and how the wall is expected to dry.
When the existing construction is unusual, professional assessment can help prevent expensive repairs later.
What Should You Insulate First?
There is no universal priority order for every older home, but the following sequence provides a useful starting point.
1. Fix Water Problems
Address roof leaks, foundation leaks, plumbing problems, drainage issues, and other sources of moisture.
2. Air Seal Major Leaks
Identify and address significant uncontrolled airflow around the attic, rim joists, windows, doors, and penetrations.
3. Improve Attic Insulation
The attic is often relatively accessible and can provide a meaningful improvement when insulation levels are inadequate.
4. Address Basement, Crawl Space, and Floor Areas
Improve the thermal boundary between living spaces and unconditioned areas based on the home’s design.
5. Upgrade Wall Insulation
Consider wall insulation when the existing assembly and project budget justify the work.
6. Improve Windows and Doors
Repair or replace these components based on their actual condition, air leakage, and thermal performance.
This sequence is a general framework rather than a strict rule. A professional energy assessment may identify a different priority for a particular home.
Common Insulation Mistakes in Older Homes
Insulating Before Fixing Leaks
Adding insulation before repairing water intrusion can hide the problem and damage the new insulation.
Adding Insulation Without Air Sealing
Uncontrolled airflow can bypass insulation and reduce its effectiveness.
Blocking Attic Ventilation
Do not obstruct intentional attic ventilation pathways with insulation.
Ignoring the Rim Joists
Rim joists can remain significant sources of air leakage even after other insulation improvements.
Assuming All Walls Are Empty
Older walls may already contain insulation that needs to be evaluated rather than automatically removed or replaced.
Using the Same Insulation Everywhere
Attics, walls, basements, crawl spaces, and floors can require different materials and assemblies.
Covering Historic Materials Without Evaluation
Historic construction may require specialized approaches to prevent moisture damage.
Focusing Only on R-Value
A high insulation rating cannot compensate for major air leaks, thermal bridges, moisture problems, or poor installation.
Sealing Everything Without Understanding the Building
Not every opening should be sealed. Some are intentional drainage or ventilation pathways.
How Much Does It Cost to Insulate an Older Home?
The cost varies substantially depending on the home’s size, age, construction, accessibility, and existing condition.
Factors that can affect the total project cost include:
- Insulation type
- Area being insulated
- Accessibility
- Existing insulation removal
- Wall demolition
- Exterior siding removal
- Air sealing
- Moisture repairs
- Labor
- Finishing work
- Required electrical or mechanical modifications
Attic insulation is often less complicated than a complete wall retrofit.
A whole-house insulation project can become a major renovation if walls, ceilings, siding, or flooring need to be opened.
Obtain estimates based on the complete scope of work rather than the price of insulation material alone.
DIY vs Professional Insulation
Some insulation-related tasks may be suitable for experienced homeowners.
Examples can include:
- Basic weatherstripping
- Certain accessible air-sealing tasks
- Simple insulation installation
- Pipe insulation
Professional assistance is recommended when the project involves:
- Extensive wall retrofits
- Spray foam
- Historic construction
- Persistent moisture
- Structural damage
- Complex electrical or plumbing systems
- Major exterior renovations
- Unusual wall assemblies
Professional evaluation can help prevent an insulation upgrade from creating new moisture, ventilation, or safety problems.
How to Maintain Insulation in an Older Home
Properly installed insulation usually requires little routine maintenance, but the surrounding building envelope should be inspected periodically.
Look for:
- Water stains
- Roof leaks
- Damaged siding
- Pest damage
- Mold
- Compressed insulation
- Missing insulation
- Drafts
- Condensation
- Damaged flashing
Inspect insulation whenever major roofing, plumbing, electrical, HVAC, or remodeling work is performed.
Repairs that disturb insulation should be followed by an inspection to ensure the thermal and air barriers remain intact.
Older Home Insulation Checklist
Use this checklist when planning an insulation upgrade:
- Identify the home’s construction type.
- Check for water and moisture problems.
- Inspect the attic.
- Check existing attic insulation.
- Inspect existing wall insulation where accessible.
- Check the basement or crawl space.
- Inspect floors over unconditioned areas.
- Check rim joists.
- Identify major air leaks.
- Inspect windows and doors.
- Check HVAC ducts.
- Choose insulation appropriate for each assembly.
- Plan air sealing.
- Consider moisture and vapor control.
- Protect intentional ventilation and drainage pathways.
- Consider historic materials when applicable.
- Follow applicable building and safety requirements.
- Inspect the completed work.
When to Hire a Professional
Professional assistance is especially useful when:
- The home’s wall construction is uncertain.
- Persistent moisture problems are present.
- The home has historic construction.
- Extensive wall insulation is required.
- Spray foam is being considered.
- Major siding or roofing work is planned.
- Structural problems are discovered.
- Complex electrical or plumbing systems are involved.
- You are unsure how new insulation will affect moisture movement.
Depending on the problem, the appropriate professional may be an insulation contractor, energy auditor, building-envelope specialist, contractor, or other qualified building professional.
The goal should be to evaluate the building as a complete system rather than treating insulation as an isolated product.
Final Thoughts
Insulating an older home can improve comfort, reduce unwanted heat transfer, and help create more consistent indoor temperatures. However, the process should begin with an assessment rather than simply adding insulation wherever space is available.
Start by fixing water problems and identifying major air leaks. Then evaluate the attic, walls, basement, crawl space, floors, windows, doors, and ductwork.
Older homes often require a combination of improvements rather than one universal insulation method. Proper air sealing, moisture management, insulation, and building-envelope maintenance should work together.
For existing walls and historic construction, take particular care not to create moisture problems by using materials or assemblies that prevent the structure from drying properly.
With careful planning and appropriate installation, an older home can become more comfortable and energy efficient while preserving the performance and durability of its existing structure.